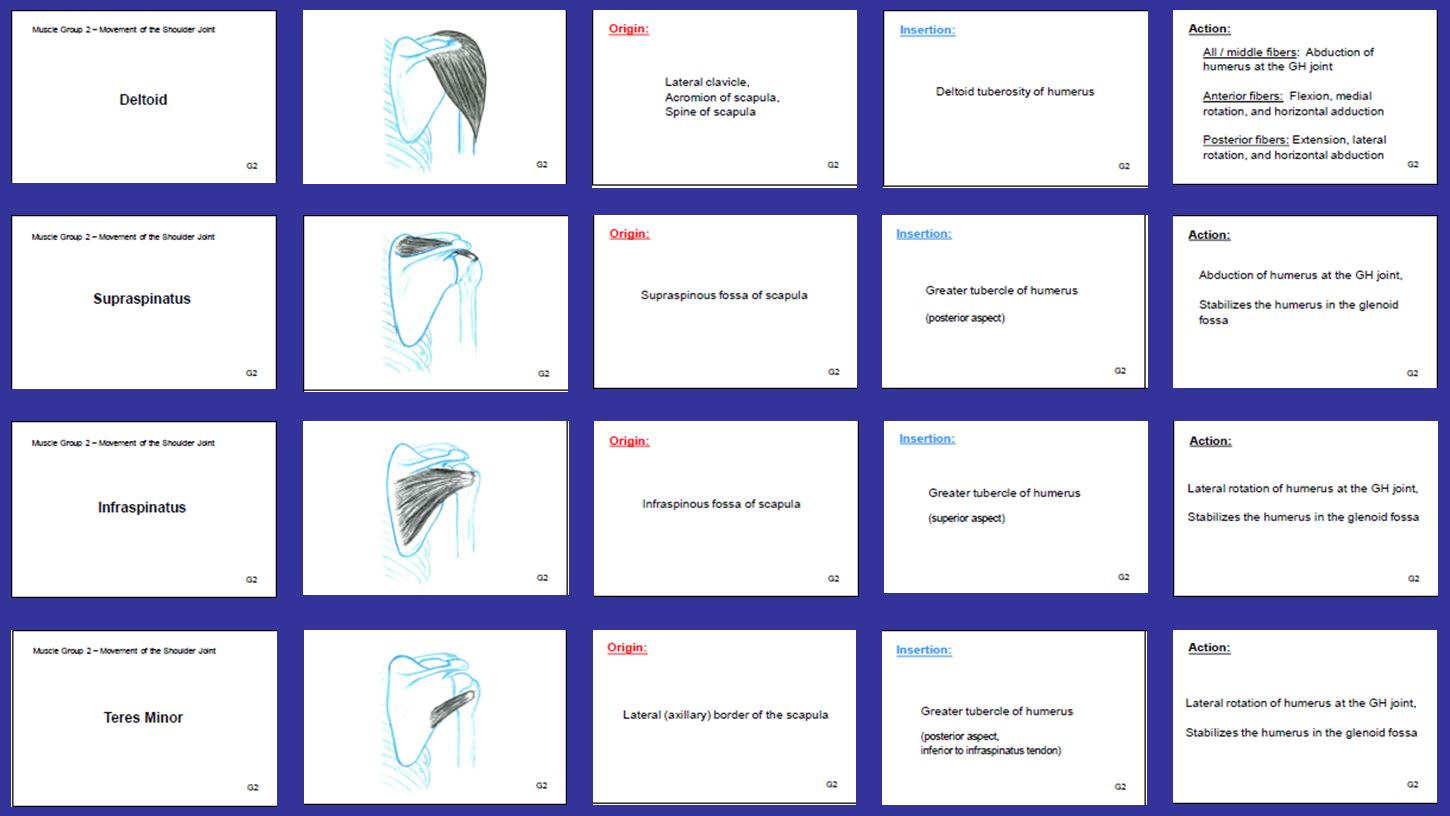
This set of cards provides a way to physically handle and arrange information while you study. For each muscle, the individual facts (name, pictures, origin, insertion, action) are unpacked onto six separate cards. You can lay out the cards in rows and columns, like playing a game of solitaire, to study and memorize the information (see instructions below). After laying out the cards per the instructions, you can easily check your work by comparing to the "A" Tables in the book.
Muscle OIA Match-Up Cards - Large (4 by 2.5 inches) (PDF 1.73MB)
Muscle OIA Match-Up Cards - Small (2.5 by 1.5 inches) (PDF 1.5MB)
You will be studying the 13 muscle groups as shown on page v in the front section of your MMM textbook (the groups are also listed on page 241).
This system works if you study only ONE muscle group at a time. So, start by cutting out the cards for only one muscle group. A muscle group identifier is shown on the lower right corner of every card. For example, "G2" indicates Muscle Group 2 - Muscles That Move the Shoulder Joint. As you continue working, keep each muscle group as a separate deck of cards, so over time you will create 13 decks of cards.
There will be 6 cards for each muscle:Muscle Name
Muscle Picture
Origin/Insertion Picture
Origin of the Muscle
Insertion of the Muscle
Actions of the Muscle
To study a Muscle Group:
1. Separate the cards into 6 stacks, with all origin cards together, insertion cards together, muscle picture cards together, etc.
2. Lay out the Muscle Name cards vertically, matching the order of the muscles shown on page v of your MMM textbook.
3. Lay out the correct Muscle Picture cards next to the muscle names.
4. Lay out the correct Origin, Insertion, and Action cards horizontally in line to go with the muscle they describe.
(See the image at the top of this page for an example of the card layout.)
How to check your work:
By following the above steps, you are essentially re-creating the "A" Table for the Muscle Group. For example, see page 86 in your MMM textbook for the "A" Table for Muscle Group 2, the muscles that move the humerus at the glenohumeral joint. If you have laid out the cards as instructed above, you can directly check your work by comparing your card arrangement with the matching "A" Table for that Muscle Group.

 Textbook Home
  Study Aids Home
